Layerd Architecture와 테스트코드
Layerd Architecture와 테스트코드
인프런 워밍업 클럽 스터디 2기 - 백엔드 클린 코드, 테스트코드(Java, Spring Boot) 과정 중 Practical Testing: 실용적인 테스트 가이드를 듣고 요약한 내용입니다. 코드의 전문은 github에서 볼 수 있습니다.
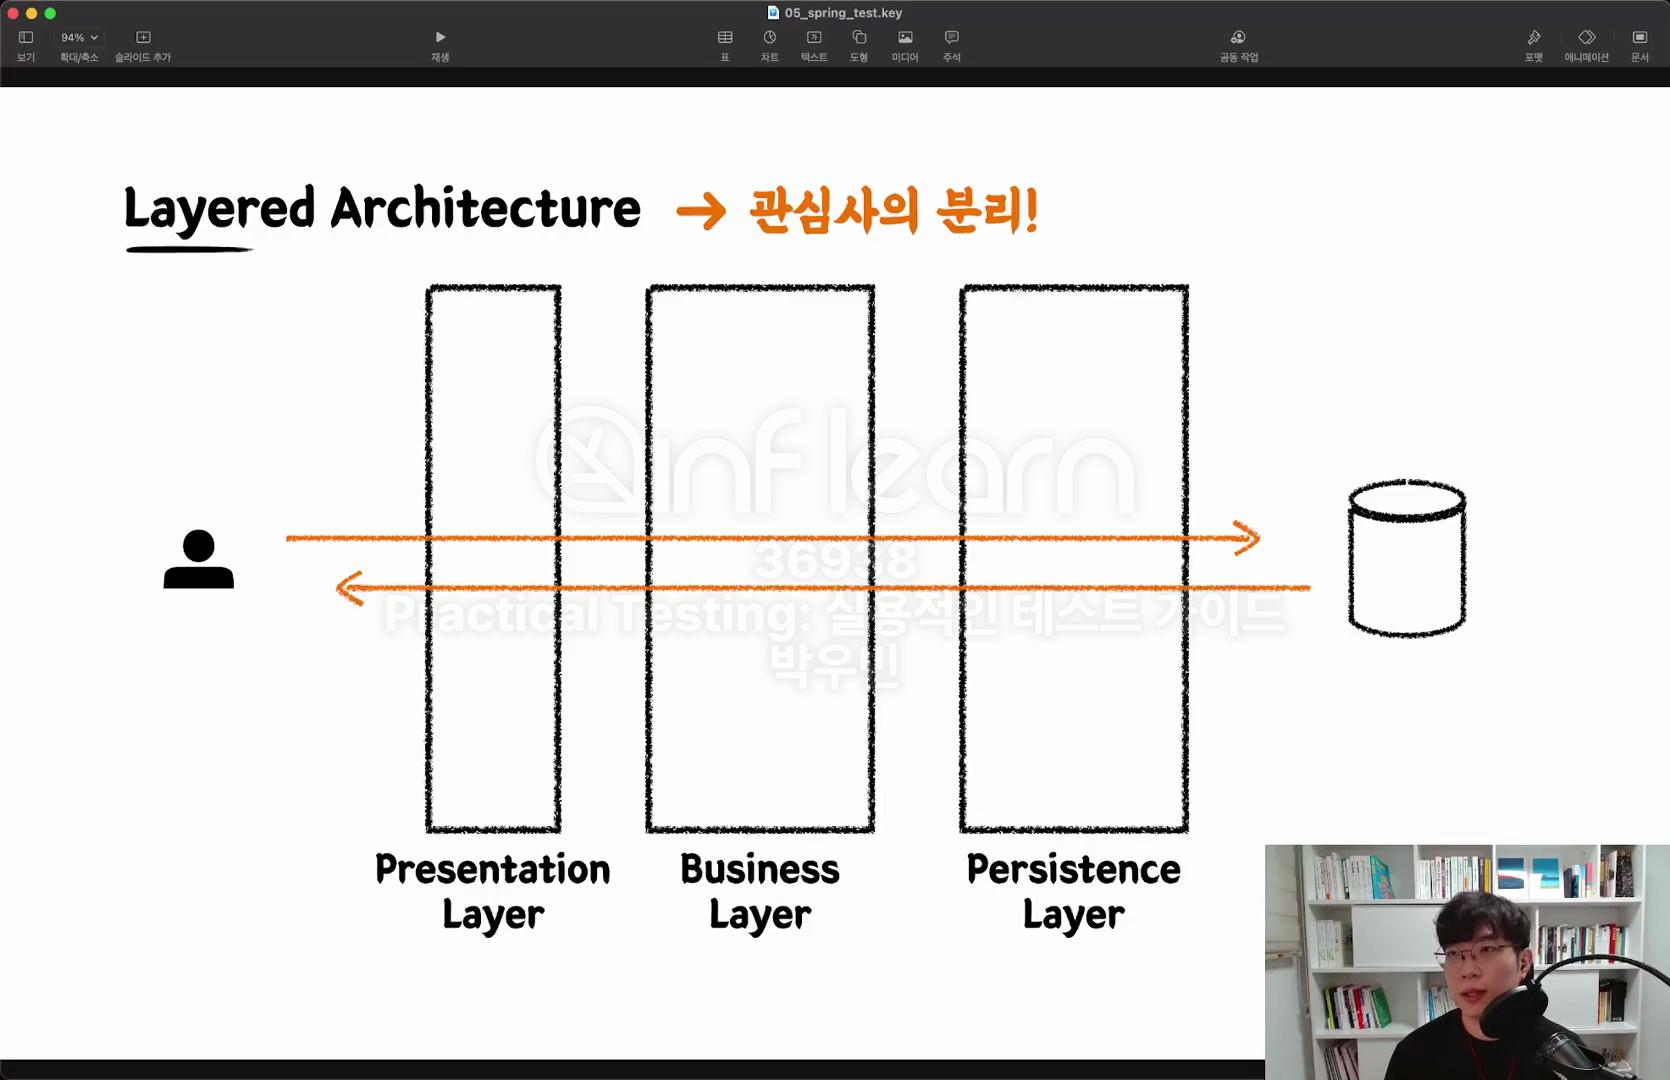
Layerd Architecture란?
Presentation Layer, Business Layer, Persistence Layer로 나뉜 계층형 아키텍쳐를 말한다.
왜 사용할까?
- 유지보수의 용이성
각 계층이 관심사가 분리되어 독립적으로 관리되므로, 특정 계층에 변경 사항이 발생해도 다른 계층에 영향을 최소화할 수 있다. - 모듈화
각 계층은 독립적인 모듈처럼 작동하여 코드 재사용성과 가독성을 높일 수 있다. - 테스트 용이성
각 계층을 별도로 테스트할 수 있어 시스템 전체의 테스트 복잡도를 줄일 수 있다. - 책임 분리
계층별로 명확한 책임이 나누어져 있어 역할과 기능이 명확해진다.
Persistence Layer
- 데이터베이스와 상호작용하는 계층
- Data Acess의 역할
- 비지니스 가공 로직이 포함되어서는 안된다.
- Data에 대한 CRUD에만 집중
Test
데이터를 저장, 검색, 업데이트하는 역할을 하는 Layer 이므로, Spring 에서는 @DataJpaTest를 사용하여 Jpa와 관련된 Bean만 로딩하여 비교적 빠르게 테스트한다. @DataJpaTest 에는 자체적으로 @Transactional이 포함되어 있기 때문에 테스트가 종료되면 자동으로 롤백된다.
1
2
3
4
5
6
7
8
9
10
11
12
13
14
15
16
17
18
19
20
21
22
23
24
25
26
27
28
29
30
31
32
33
34
35
36
37
38
39
40
41
42
package sample.cafekiosk.spring.domain.stock;

import org.junit.jupiter.api.DisplayName;
import org.junit.jupiter.api.Test;
import org.springframework.beans.factory.annotation.Autowired;
import org.springframework.boot.test.autoconfigure.orm.jpa.DataJpaTest;

import java.util.List;

import static org.assertj.core.api.Assertions.assertThat;
import static org.assertj.core.api.Assertions.tuple;

@DataJpaTest
class StockRepositoryTest {

    @Autowired
    StockRepository stockRepository;

    @DisplayName("상품번호 리스트로 재고를 찾는다.")
    @Test
    void findAllByProductNumberIn() {
        // given
        Stock stock1 = Stock.create("001", 1);
        Stock stock2 = Stock.create("002", 2);
        Stock stock3 = Stock.create("003", 1);

        stockRepository.saveAll(List.of(stock1, stock2, stock3));

        // when
        List<Stock> stocks = stockRepository.findAllByProductNumberIn(List.of("001", "002"));


        // then
        assertThat(stocks).hasSize(2)
                .extracting("productNumber", "quantity")
                .containsExactlyInAnyOrder(
                        tuple("001", 1),
                        tuple("002", 2)
                );
    }

}
Business Layer
- 핵심적인 비지니스 로직을 처리하는 계층
- 사용자의 요청을 처리하고, 해당 요청에 따라 필요한 데이터를 가공하거나 비지니스 규칙을 적용
- Transaction을 보장해야한다
Test
핵심적인 비지니스 로직을 처리하는 Layer 이므로, Spring에서는 @SpringBootTest를 사용하여 모든 Bean을 로딩하여 테스트한다.
외부 모듈이 필요한 경우에는 @Mock과 @Spy @Stub을 활용하여 테스트한다.
1
2
3
4
5
6
7
8
9
10
11
12
13
14
15
16
17
18
19
20
21
22
23
24
25
26
27
28
29
30
31
32
33
34
35
36
37
38
39
40
41
42
43
44
45
46
47
48
49
50
51
52
53
54
55
56
57
58
59
60
61
62
63
64
65
66
67
68
69
70
71
72
package sample.cafekiosk.spring.api.service.product;

import org.junit.jupiter.api.AfterEach;
import org.junit.jupiter.api.DisplayName;
import org.junit.jupiter.api.Test;
import org.springframework.beans.factory.annotation.Autowired;
import org.springframework.boot.test.context.SpringBootTest;
import org.springframework.test.context.ActiveProfiles;
import org.springframework.transaction.annotation.Transactional;
import sample.cafekiosk.spring.api.service.product.request.ProductCreateServiceRequest;
import sample.cafekiosk.spring.api.service.product.response.ProductResponse;
import sample.cafekiosk.spring.domain.product.Product;
import sample.cafekiosk.spring.domain.product.ProductRepository;
import sample.cafekiosk.spring.domain.product.ProductSellingStatus;
import sample.cafekiosk.spring.domain.product.ProductType;

import java.util.List;

import static org.assertj.core.api.Assertions.assertThat;
import static org.assertj.core.api.Assertions.tuple;
import static sample.cafekiosk.spring.domain.product.ProductSellingStatus.SELLING;
import static sample.cafekiosk.spring.domain.product.ProductType.HANDMADE;

@SpringBootTest
@ActiveProfiles("test")
//@Transactional
class ProductServiceTest {

    @Autowired
    private ProductService productService;

    @Autowired
    private ProductRepository productRepository;

    // @Transactional이 ProductServiceTest에 선언되어 있는 경우 주석 가능하다.
    @AfterEach
    void tearDown() {
        productRepository.deleteAllInBatch();
    }

    @DisplayName("신규 상품을 등록한다. 상품번호는 가장 최근 상품의 상품번호에서 1 증가한 값이다.")
    @Test
    void createProduct() {
        // given
        Product product1 = getProduct("001", HANDMADE, SELLING, 4000, "아메리카노");

        productRepository.save(product1);

        ProductCreateServiceRequest request = ProductCreateServiceRequest.builder()
                .name("새로운 상품")
                .type(HANDMADE)
                .sellingStatus(SELLING)
                .price(5000)
                .build();

        // when
        ProductResponse response = productService.createProduct(request);

        // then
        assertThat(response).extracting("productNumber", "type", "sellingStatus", "price", "name")
                .containsExactly("002", HANDMADE, SELLING, 5000, "새로운 상품");

        List<Product> products = productRepository.findAll();
        assertThat(products).hasSize(2)
                .extracting("productNumber", "type", "sellingStatus", "price", "name")
                .containsExactlyInAnyOrder(
                        tuple("001", HANDMADE, SELLING, 4000, "아메리카노"),
                        tuple("002", HANDMADE, SELLING, 5000, "새로운 상품")
                );

    }
}
Presentation Layer
- 외부 세계의 요청을 가장 먼저 받는 계층
- 사용자가 시스템과 상호 작용하는 부분으로, 데이터를 입력받고 결과를 화면에 출력하는 역할
- 파라미터에 대한 최소한의 검증을 수행
Test
사용자와의 상호작용을 담당하는 Layer이므로, Spring에서는 @WebMvcTest와 @MockMvc를 통해 Controller를 구현하고 나머지 Bean들은 @MockBean을 사용하여 테스트한다.
1
2
// https://mvnrepository.com/artifact/org.springframework.boot/spring-boot-starter-validation
implementation 'org.springframework.boot:spring-boot-starter-validation'
파라미터에 대한 검증은 @Valid를 통해 진행한다. @Valid 에는 Max, NotNull, Email, Positive, Pattern 등 여러가지 어노테이션을 지원한다. 공식 api 문서
1
2
3
4
5
6
7
8
9
10
11
12
13
14
15
16
17
18
19
20
21
22
23
24
25
26
27
28
29
30
31
32
33
34
35
36
37
38
39
40
41
42
43
44
45
46
47
48
49
50
51
52
53
54
55
56
57
58
59
60
61
62
63
64
65
66
67
68
69
70
71
72
73
74
75
76
77
78
package sample.cafekiosk.spring.api.controller.order;

import com.fasterxml.jackson.databind.ObjectMapper;
import org.junit.jupiter.api.DisplayName;
import org.junit.jupiter.api.Test;
import org.springframework.beans.factory.annotation.Autowired;
import org.springframework.boot.test.autoconfigure.web.servlet.WebMvcTest;
import org.springframework.boot.test.mock.mockito.MockBean;
import org.springframework.http.MediaType;
import org.springframework.test.web.servlet.MockMvc;
import sample.cafekiosk.spring.api.controller.order.request.OrderCreateRequest;
import sample.cafekiosk.spring.api.service.order.OrderService;

import java.util.List;

import static org.springframework.test.web.servlet.request.MockMvcRequestBuilders.post;
import static org.springframework.test.web.servlet.result.MockMvcResultHandlers.print;
import static org.springframework.test.web.servlet.result.MockMvcResultMatchers.jsonPath;
import static org.springframework.test.web.servlet.result.MockMvcResultMatchers.status;

@WebMvcTest(controllers = OrderController.class)
class OrderControllerTest {

    @Autowired
    MockMvc mockMvc;

    @Autowired
    ObjectMapper objectMapper;

    @MockBean
    OrderService orderService;

    @DisplayName("새로운 주문을 생성할 수 있다.")
    @Test
    void createOrder() throws Exception {
        // given
        OrderCreateRequest request = OrderCreateRequest.builder()
                .productNumbers(List.of("001"))
                .build();

        // when
        // then
        mockMvc.perform(
                        post("/api/v1/orders/new")
                                .content(objectMapper.writeValueAsString(request))
                                .contentType(MediaType.APPLICATION_JSON)
                )
                .andDo(print())
                .andExpect(status().isOk())
                .andExpect(jsonPath("$.code").value("200"))
                .andExpect(jsonPath("$.status").value("OK"))
                .andExpect(jsonPath("$.message").value("OK"));
    }

    @DisplayName("새로운 주문을 생성할 때 상품 번호는 필수값이다.")
    @Test
    void createOrderWithEmptyProductNumber() throws Exception {
        // given
        OrderCreateRequest request = OrderCreateRequest.builder()
                .productNumbers(List.of())
                .build();

        // when
        // then
        mockMvc.perform(
                        post("/api/v1/orders/new")
                                .content(objectMapper.writeValueAsString(request))
                                .contentType(MediaType.APPLICATION_JSON)
                )
                .andDo(print())
                .andExpect(status().isBadRequest())
                .andExpect(jsonPath("$.code").value("400"))
                .andExpect(jsonPath("$.status").value("BAD_REQUEST"))
                .andExpect(jsonPath("$.message").value("상품 번호 리스트는 필수 항목입니다."))
                .andExpect(jsonPath("$.data").isEmpty());
    }

}
This post is licensed under CC BY 4.0 by the author.